Friday, March 31, 2017

Brighamia insignia Germination Instructions

I found this on a University of Hawaii webpage: Propagation by Seeds Cultivated plants may begin to flower as early as their first year, but usually not for two or three years. Hand pollination should increase seed production since the native pollinator is presumed to be extinct. To hand pollinate Brighamia, use a small paint brush to transfer the pollen. When the flowers are a couple of days old, the pollen will begin being shed. Use the paint brush to pick up pollen that has fallen onto the flower tube and apply the pollen to the stigma of another flower. The stigma is ready to receive the pollen when it appears shiny and sticky. According to Koob, if pollination is successful, the base of the flower will start to swell within a couple of days. The fruit of Brighamia insignis is a green capsule about 1/2 inch long which ripens six to eight weeks after pollination. When mature, the capsule splits open releasing many small, smooth seeds. Hannon states that the capsules may still be green when the open or they may have turned pale yellow or light cream in color. Some seeds may remain stuck to the sides of the capsule. The capsules can be harvested just as they start to crack open. Place the capsules in a paper bag or envelope until the seeds fall out of the open capsule. Most sources state that Brighamia seeds require light to germinate and to sprinkle the seeds on the surface of moist, fine textured medium that drains well such as fine perlite or commercial peat/perlite potting mix. Hannon suggests a light covering of fine potting medium. Use of a mist system is suggested by NTBG. Seeds should be kept in partial shade. Koob indicates that the seeds will begin germinating in a couple of weeks and that most seeds will sprout at the same time. Christensen writes that the first seed germinated in 11 days and germination continued for 2 months. His final germination rate was 66%. Hannon reports sporadic germination beginning in two weeks. NTBG (Ragone 1993) reports 44% germination rate after 3 months for seeds stored for 5 months at 80 degrees F and 25% relative humidity. Seed can be sown fresh or can be stored. Koob states that they can be kept in a refrigerator for up to 2 or 3 years. Hannon, however, writes that viability declines rapidly after 10 to 12 months. NTBG (Ragone 1993) reports that the seeds were no longer viable after storage at ambient temperature (80 degrees F) and relative humidity (25%) for 17 months. (Christensen 1979; Hannon 2002; Koob 2000; NTBG 1992; Ragone 1993; Wagner 1999) Here are the bases of the flowers I pollinated a couple of weeks back (at least I think they are pollinated). And here are some bases that have not been pollinated. I'll keep posting updates as this process moves forward. 4/5/17 Update - some of the bases of the last crop of flowers are splitting. The article describes this - so I'm going to try and bag the pods so I can capture the seeds.

Thursday, March 30, 2017

Last of the Plant Mail (for Awhile)

I got home late (Westside Oahu traffic is legendary for it's duration and lack of speed), but came home to two packages. The first was essentially a birthday present for La (a leafless Bird of Paradise - Strelitia juncea), but the rest were caudiciforms (for me). This is going to be the last plant mail I get for a little bit (trying to pay off other bills) - but this was a good delivery!!! This first one is another Hydophytum formicarum. These plants are supposed to be self-fertile, but genetic diversity is not a bad thing. The next plant is a Pseudobombax ellipticum. After the last garden visit I went on, I got mesmerized by this plant. The grower didn't know which variety this one was (red or white flower), so it is going to be a long waiting game (but all of this boils down to patience anyways right?). And the last plant that came in is a Pelargonium cotyledonis. The leaves got beat up during shipment, but I'm sure the plant will bounce back quickly. I'll take more pictures of these potted up this afternoon. UPDATE - and here they are:

Tuesday, March 28, 2017

Different Euphorbia

Perla (from the CSSH - Mahalo again!) gave me this cutting. She said it grows like an Opuntia. I initially thought these growths were new segments, but upon closer inspection, it looks as if they are flowers. I'll have to do some more research into this one. UPDATE - Perla said this is a Euphorbia opuntiatoides

Jatropha podagrica Seedling Update

The cotyledons are out and look very strong on this first seedling. There are a couple more seedlings coming along behind the first one -

Sunday, March 26, 2017

Elephantorrhiza elephantina Coming Out of Dormancy

This plant was given to us by Nathan W. It's last leaves fell in the November time period. We weren't sure if it died or not - but from our limited experience, you'll know when a plant is dead (soft and mushy as rot sets in). Well - the leaves are starting to emerge! We saw Nathan's when we visited his garden and it was spectacular!!! I'm going to make a custom pot for this plant in this next batch I take to the ceramics shop. I hope to get some good growth out of this plant this year.

Gasteria glomerata Flowers

These flowers kind of look like flamingo heads... These have been around for a while and don't look like they'll wear down any time soon.

Fours and Fives back down to Three

The Hylocereus plants we grew out from seed developed into seedlings with 3, 4 or 5 radial segments. Funny thing is the adult plants only have three radial segments. Well - here are a couple of pictures of some of our plants transforming into the adult segmentation. Pretty neat to see this happening.

"I swear this is the last time I do this...."

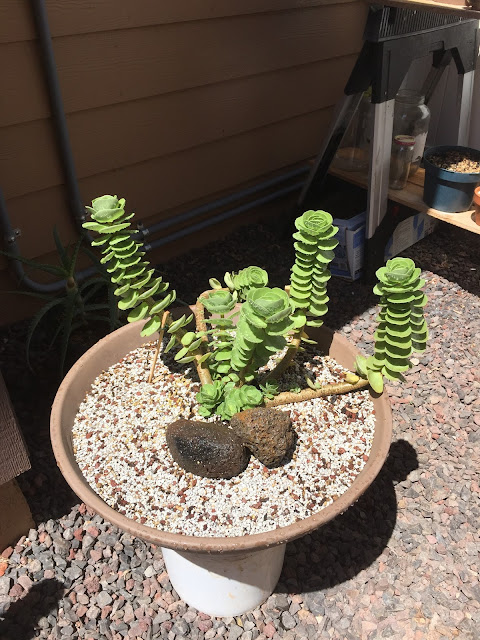
I recently saw a picture on a blog that showed a Portulaca molokiniensis that has been allowed to grow unbounded - and my jaw dropped (here's the picture, credit to Gerhard Bock of Succulents and More Blog). So now I am on a mission to grow my plants out to this range and I'm starting with the one that has already taken off in that direction (the one that started drooping on me). Silly me for thinking something was wrong - this plant was just asking for a repotting into a very large bowl - which I just so happen to have... So I repotted it yet again, but this time with the intentions to allow it to grow out as much as possible. I used the two rocks to make sure the root ball was anchored down (notice it is directly opposite the leaning trunks - lots of leverage and my incessant repotting isn't helping any). But they actually add a really nice dimension. The chopstick props are temporary - once the roots get established, I remove those and relocate the rocks (into a more decorative position). Of note, this started out as one single little cloned cutting (bought from Once Again Succulents). These plants really like the climate-weather out here on the Ewa Plain - hot summers, some humidity, breezy and lots of sunshine year round - kinda like Molokini